

What actually is "Raspberry Pi"?
This tutorial is intended to serve as a basis for learning the Raspberry Pi OS with a focus on the Python programming language. It is intended to give beginners a simple, interesting and closely guided introduction to the topics "Computational Thinking" and "Physical Computing". The tutorial is mainly oriented towards practical tasks with a theoretical introduction beforehand. It is essential to read this beforehand in order not to fail in the later practical tasks due to trivialities.
This manual was developed in the context of a teaching activity. It can be used free of charge to learn the basics about Raspberry Pi computers, but cannot be copied or used in any other way without permission. The tutorial has been carefully created and is continuously maintained, but no guarantee is given for its correctness and completeness.
For the practical tasks you should be provided with some electronic components. On the website funduinoshop.de you can order suitable sensor sets, which are specially designed for these instructions.
The Raspberry Pi with meanwhile a variety of different models is in contrast to the micro controller (e.g. Funduino Uno or Nano) a real computer with a Linux-based operating system (Raspberry Pi OS, formerly Raspbian). The operating system as well as application programs and data are located on a µSD card (8 to 32 GB), which is loaded at startup. The most important interfaces are first the USB sockets for keyboard and mouse as well as the HDMI interface(s) to the monitor.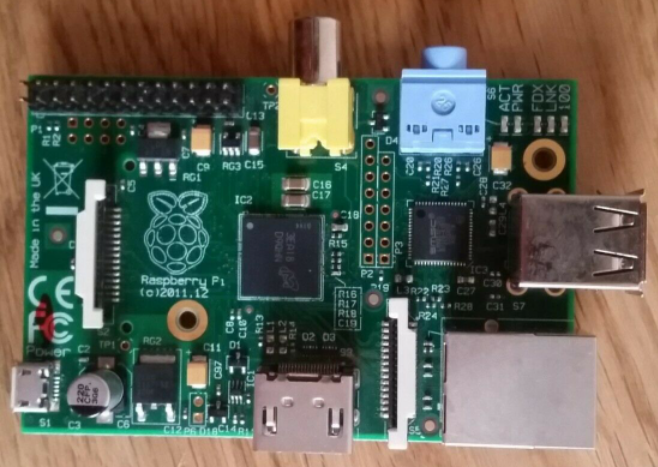
Raspberry Pi B (2012)
The great success of the Raspberry Pi is based both on programming with the widely used Python programming language and on the possibility of connecting electronic components to the 40-pin J6 header (often called GPIO header). This is identical for all models since 2014. When it comes to nomenclature, you have to be careful whether you mean the physical pin (in the picture on the left the odd numbers from 1 to 39, on the right the even numbers from 2 to 40) or the GPIO designation. For example, the physical pin 11 corresponds to GPIO17 (General Purpose Input Output connector 17 of the processor). GPIOs are therefore digital inputs or outputs, as in the case of the micro controller.
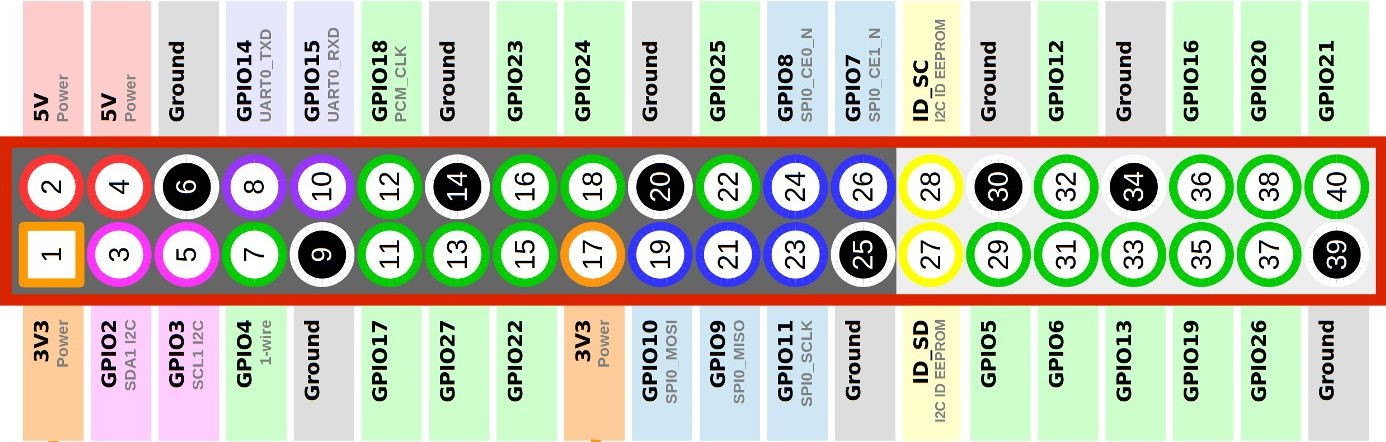
Figure J6 header: 40 pins, of which 2x3.3V, 2x5V, 8xGround, 26xGPIOs, 2 reserved
Some of the pins have a secondary assignment as electronic interface, e.g. One Wire at pin 7, I2C (= Inter-Integrated Circuit) at pins 3 and 5, UART (= Universal Asynchronous Receiver and Transmitter) at pins 8 and 10 and SPI (=Serial Peripheral Interface) at pins 19, 21, 23 and 24 or 26. This secondary assignment is defined in the operating system in the Raspberry Pi configuration. More about this in the respective examples.


ok